Writing up a how-to guide usually leaves you with a folder full of numbered screenshots — one PNG per step, none of them useful as a document until they're combined into something a reader can actually open in order. The same problem shows up with exported charts for a report, or a run of screenshots saved for a support ticket: individually, they're just loose files. Combined, they're a document.
Converting a set of PNGs into one PDF solves this directly, and it's a slightly different job than converting photos, because PNG is a different kind of image with its own quirks — most notably, what happens to transparent backgrounds once they land on a page. This guide covers the conversion itself, that transparency detail specifically, and the small habits that make a screenshot-based PDF actually easy to follow.
What Happens When You Convert PNG to PDF
A PNG to PDF conversion places each image you upload onto its own page, in the order you added them, inside one new PDF. My PDF's PNG to PDF tool keeps every image at its original, lossless resolution — nothing is recompressed or softened in the process, which matters more for PNGs than it might for other formats.
That's because PNG is specifically a lossless format: unlike JPG, which trades a little detail for a smaller file size, PNG stores every pixel exactly. That's precisely why it's the default choice for screenshots, UI mockups, charts and anything with sharp edges or small text — a JPG compressed at anything less than very high quality tends to introduce a soft blur or blocky artifacts right around text and hard edges, which is exactly the kind of content a screenshot is full of. Converting PNGs to PDF preserves that crispness completely, since the conversion doesn't touch the image data itself, only where it sits on the page.
The Transparency Detail That Catches People Off Guard
Here's the one thing about PNG specifically that's worth knowing before you convert anything, because it surprises people more than any other part of this process.
PNG supports transparency — a logo exported without a background fill, an icon, or a diagram built to sit on top of something else, with the areas around it left genuinely see-through rather than filled with white or any other color. A PDF page, on the other hand, is not transparent. It's a flat, opaque surface. So when a PNG with a transparent background gets placed onto a PDF page, whatever was "see-through" in the original image renders against the page's plain white background instead.
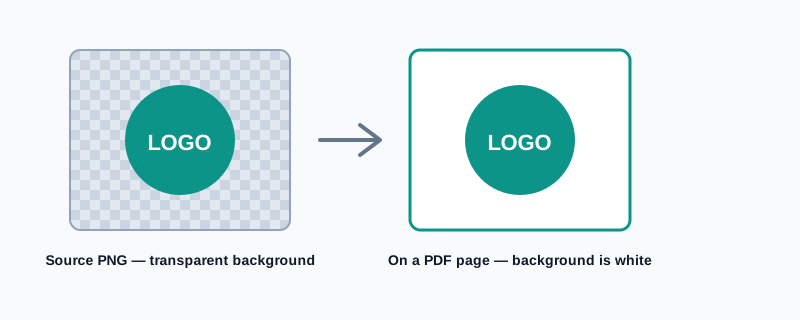
For most screenshots this doesn't matter at all — a screenshot of an app window already has a solid background, so there's nothing transparent to worry about. It matters specifically for logos, icons, or diagrams that were deliberately exported without a background, expecting to sit on top of something else — a colored slide, a branded template, a dark theme. Converted straight to PDF, that image will simply appear on white, which may or may not be what you actually wanted.
Common Reasons to Convert PNGs to PDF
- Step-by-step instructional guides. A numbered sequence of screenshots, each showing one step, combined into a single document a reader can follow from start to finish.
- Combining exported charts or diagrams into a report. Several chart exports from a spreadsheet or analytics tool, brought together as one shareable document instead of loose image attachments.
- Archiving a run of screenshots for a record. Confirmation screens, a chat exchange, a support ticket thread — saved as PNGs and then combined into one file for later reference.
- Reviewing a set of design mockups. UI screens or design exports from a presentation or design tool, combined into a single document for feedback or sign-off.
How to Convert PNG to PDF, Step by Step
Step 1: Open the PNG to PDF Tool
Go to My PDF's PNG to PDF tool. No account or software to install.
Step 2: Upload Your Images in Order
Drag your PNG files into the upload area, or click to browse and select them. Images are combined in the order you upload them, so sequence them correctly beforehand if it matters — and for a step-by-step guide, it always does.
Step 3: Review the List Before Converting
Double-check every step is present, nothing's duplicated, and the order looks right.
Step 4: Click "Convert to PDF"
Each image is placed on its own page in seconds, at full original quality.
Step 5: Download Your PDF
Your screenshots or diagrams now exist as one properly ordered document, ready to share, print or attach to a support ticket or report.
A Practical Example: Turning Eight Screenshots Into a Step-by-Step Guide
Say you're documenting how to update a setting in a piece of software, and you've captured eight screenshots along the way, one per step.
- Rename the files
step-01.pngthroughstep-08.pngso they sort correctly. - Upload all eight to PNG to PDF, confirming the list shows them in the right order.
- Convert and download — you now have a single instructional PDF instead of eight loose files.
- If you realize a step is missing after the fact, there's no need to redo the whole thing — convert just the missing screenshot on its own and use Merge PDF to slot it into the existing document at the right point.
- If the final order needs adjusting once you see it all together, Organize Pages fixes that directly on the finished PDF.
That's the whole workflow — name in order, convert, and patch anything minor afterward rather than starting over.
Common Mistakes When Converting Screenshots to PDF
Uploading images in an inconsistent order. Without a naming convention, "upload order" often ends up being whatever order your screenshot tool happened to save files in — a minute renaming files first avoids a redo.
Forgetting that transparent backgrounds turn white. A logo or diagram designed to sit on a colored background will appear on plain white in the finished PDF, since PDF pages don't preserve transparency. Add a background fill first in an image editor if that matters.
Mixing in JPG files by mistake. This tool is specifically for PNG images. If some files are JPGs — common when screenshots and photographed pages get mixed together — convert those separately with JPG to PDF, then combine the two results with Merge PDF.
Capturing screenshots at inconsistent zoom or window sizes. A guide where every screenshot is a different size looks noticeably less polished than one where the browser or app window stayed consistent throughout the capture process.
Forgetting to check for sensitive information in a screenshot. Account numbers, email addresses, or personal details visible in a captured screen sometimes slip through unnoticed — worth a quick check before combining and sharing a set of screenshots more widely.
PNG to PDF vs. Other Ways to Combine Images
| Method | Best suited for | Keeps text and edges sharp | Needs extra software |
|---|---|---|---|
| PNG to PDF | Screenshots, diagrams, UI mockups | Yes, lossless | No |
| JPG to PDF | Photographs of physical pages or objects | Good, but can soften fine text at lower quality | No |
| Pasting images into a document, then exporting | Embedding a few images inside a larger written report | Depends on the image and export settings | Yes |
If what you're combining is screenshots or anything with sharp text and flat colors, PNG to PDF is the more reliable choice of the three — it's built around exactly the kind of image data that format produces.
What If You Also Have JPGs to Combine?
It's common to end up with a mix — a few PNG screenshots alongside JPG photos taken with a phone camera for the same document. Since PNG to PDF only accepts PNG files, the straightforward path is:
- Convert your PNGs into one PDF with PNG to PDF.
- Convert your JPGs into a separate PDF with JPG to PDF.
- Combine the two resulting PDFs into one final document with Merge PDF.
Keeping each format's conversion separate keeps the process predictable, even though it adds one extra step.
Tips & Best Practices
- Name files with numeric prefixes before uploading, so upload order matches the order you actually intend.
- Add a background fill first for any transparent PNG that's meant to sit on a specific color, since the resulting PDF page will otherwise be plain white behind it.
- Keep screenshots visually consistent — same zoom level, same window size — for a guide that reads as one coherent document rather than a patchwork.
- Check for sensitive details before sharing. A quick scan for visible account numbers or personal information takes seconds and avoids an awkward follow-up.
- Resize very large PNGs first if file size matters. A dozen high-resolution screenshots can add up to a sizeable PDF — shrinking source images beforehand keeps the final file more manageable.
Key Takeaways
- PNG to PDF keeps every image at its original, lossless quality — ideal for screenshots, diagrams and anything with sharp text.
- Transparent backgrounds don't stay transparent once placed on a PDF page — they render on plain white, so add a background fill first if that matters.
- Naming screenshots with numeric prefixes before uploading is the simplest way to guarantee the right page order in an instructional guide.
- JPG files need their own separate conversion pass — combine the two results afterward with Merge PDF.
- A missing step or a wrong page order doesn't require starting over — Merge PDF and Organize Pages fix both directly on the finished file.
Related Reading
If your files are actually phone photographs rather than screenshots, how to convert JPG to PDF covers that related but distinct use case. For more guides like this one, browse the full blog or the complete tools directory. For background on the image format itself, see Wikipedia's entry on PNG.
Got a set of screenshots or diagrams to turn into one document? Open the PNG to PDF tool and have your combined PDF ready in seconds.
Comments
Comments aren't open on the blog yet. In the meantime, share this article using the buttons above, or reach us directly at contact@mypdf.tech.